
ba5agkai at gmail.com 2015-02-28
从树莓派官网 http://raspberrypi.org 的下载页面下载Raspbian的最新版本。这次下载到的是2014年12月24日发布的版本。因为速度实在太慢,下了Torrent的种子,由bt软件去下载了。
这次下载得到的文件是:2014-12-24-wheezy-raspbian.img 。
准备了8G的SD卡,把SD卡插入Mac,先mount看一下:
/dev/disk2s1 on /Volumes/Untitled (ntfs, local, nodev, nosuid, read-only, noowners)
说明会这个SD卡被识别为/dev/disk2。
在Finder里关闭这个盘,然后:
sudo dd if=2014-12-24-wheezy-raspbian.img of=/dev/disk2 bs=1m
dd完成后,这个盘会被自动mount回来,卷标是boot。打开,找到其中的cmdline.txt文件,编辑。将其中的
dwc_otg.lpm_enable=0 console=ttyAMA0,115200 kgdboc=ttyAMA0,115200 console=tty1 root=/dev/mmcblk0p2 rootfstype=ext4 elevator=deadline rootwait
改成
dwc_otg.lpm_enable=0 console=tty1 root=/dev/mmcblk0p2 rootfstype=ext4 elevator=deadline rootwait
这样就不会在启动时将串口用做终端了。
上电后,在路由器管理页面上找到这个树莓派,将它的IP地址静态分配为192.168.1.21。
ssh进入,默认用户pi,默认密码raspberry。先做基本配置:
sudo raspi-config
这些菜单项需要做一下:
1 Expand Filesystem
    进去把SD卡扩展一下
2 Change User Password
    修改默认密码
4 Internationalisation Options
    I2 Change Timezone
    修改为亚洲/上海
8 Advanced Options
    A2 Hostname
    修改为NTPSRV
    A7 Serial
    禁止串口上的shell
最后重启一下RPi。
因为RPi是默认装了ntpd的,所以再起来以后,你会发现时间已经是正确的了。
先来刷新、更新:
sudo apt-get update
sudo apt-get upgrade
sudo apt-get dist-upgrade
sudo rpi-update
做完后,检查一下:
uname -a
得到
Linux NTPSRV 3.12.35+ #733 PREEMPT Tue Jan 6 21:03:44 GMT 2015 armv6l GNU/Linux
sudo apt-get install picocom
然后就可以进picocom看一下:
picocom /dev/ttyAMA0
这是默认的开始界面:
picocom v1.7

port is        : /dev/ttyAMA0
flowcontrol    : none
baudrate is    : 9600
parity is      : none
databits are   : 8
escape is      : C-a
local echo is  : no
noinit is      : no
noreset is     : no
nolock is      : no
send_cmd is    : sz -vv
receive_cmd is : rz -vv
imap is        :
omap is        :
emap is        : crcrlf,delbs,

Terminal ready
Ctrl-A然后Ctrl-X退出picocom。
G3203是基于U-Blox NEO 5Q做的GPS板,板上除了UART输出的NMEA-0183数据外,也会输出PPS。
图2-1是测试PPS信号的电路连线:
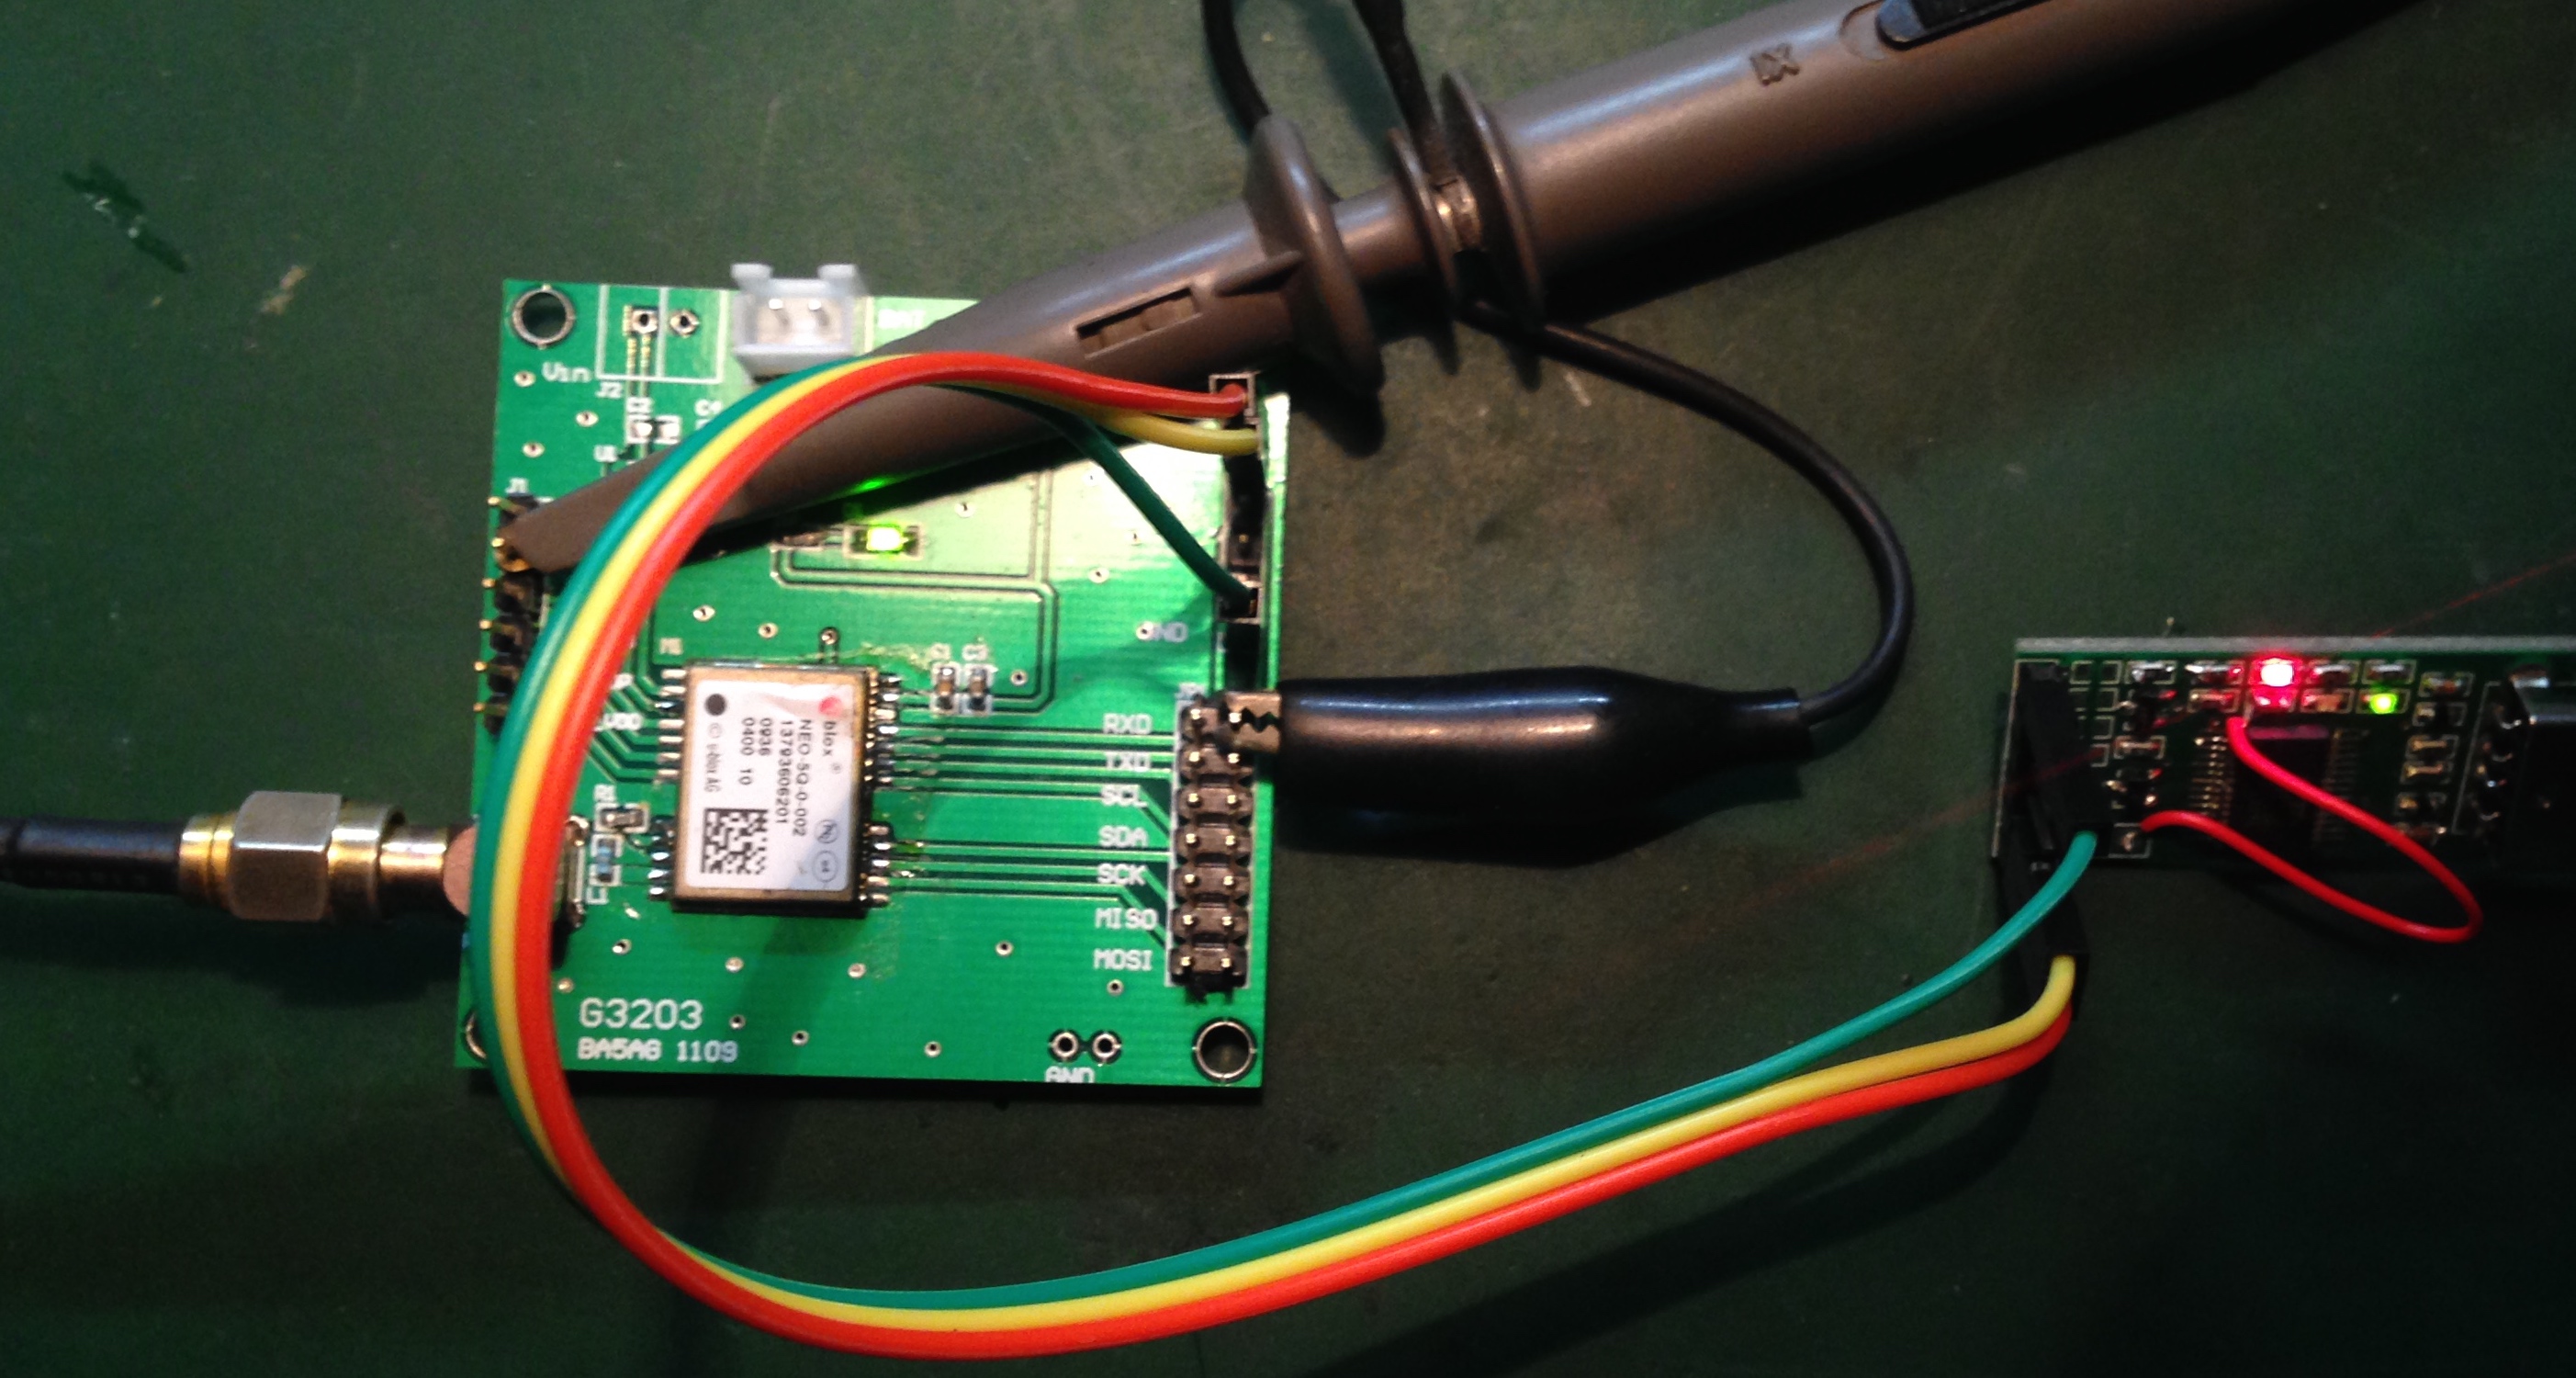 右边的USB串口板同时给GPS供电。示波器探头接在PPS输出上。G3203的J1的2脚标着TP,意思是time pulse,就是5Q的PPS输出。
图2-2是PPS信号,从中可以看出每秒一个正脉冲:
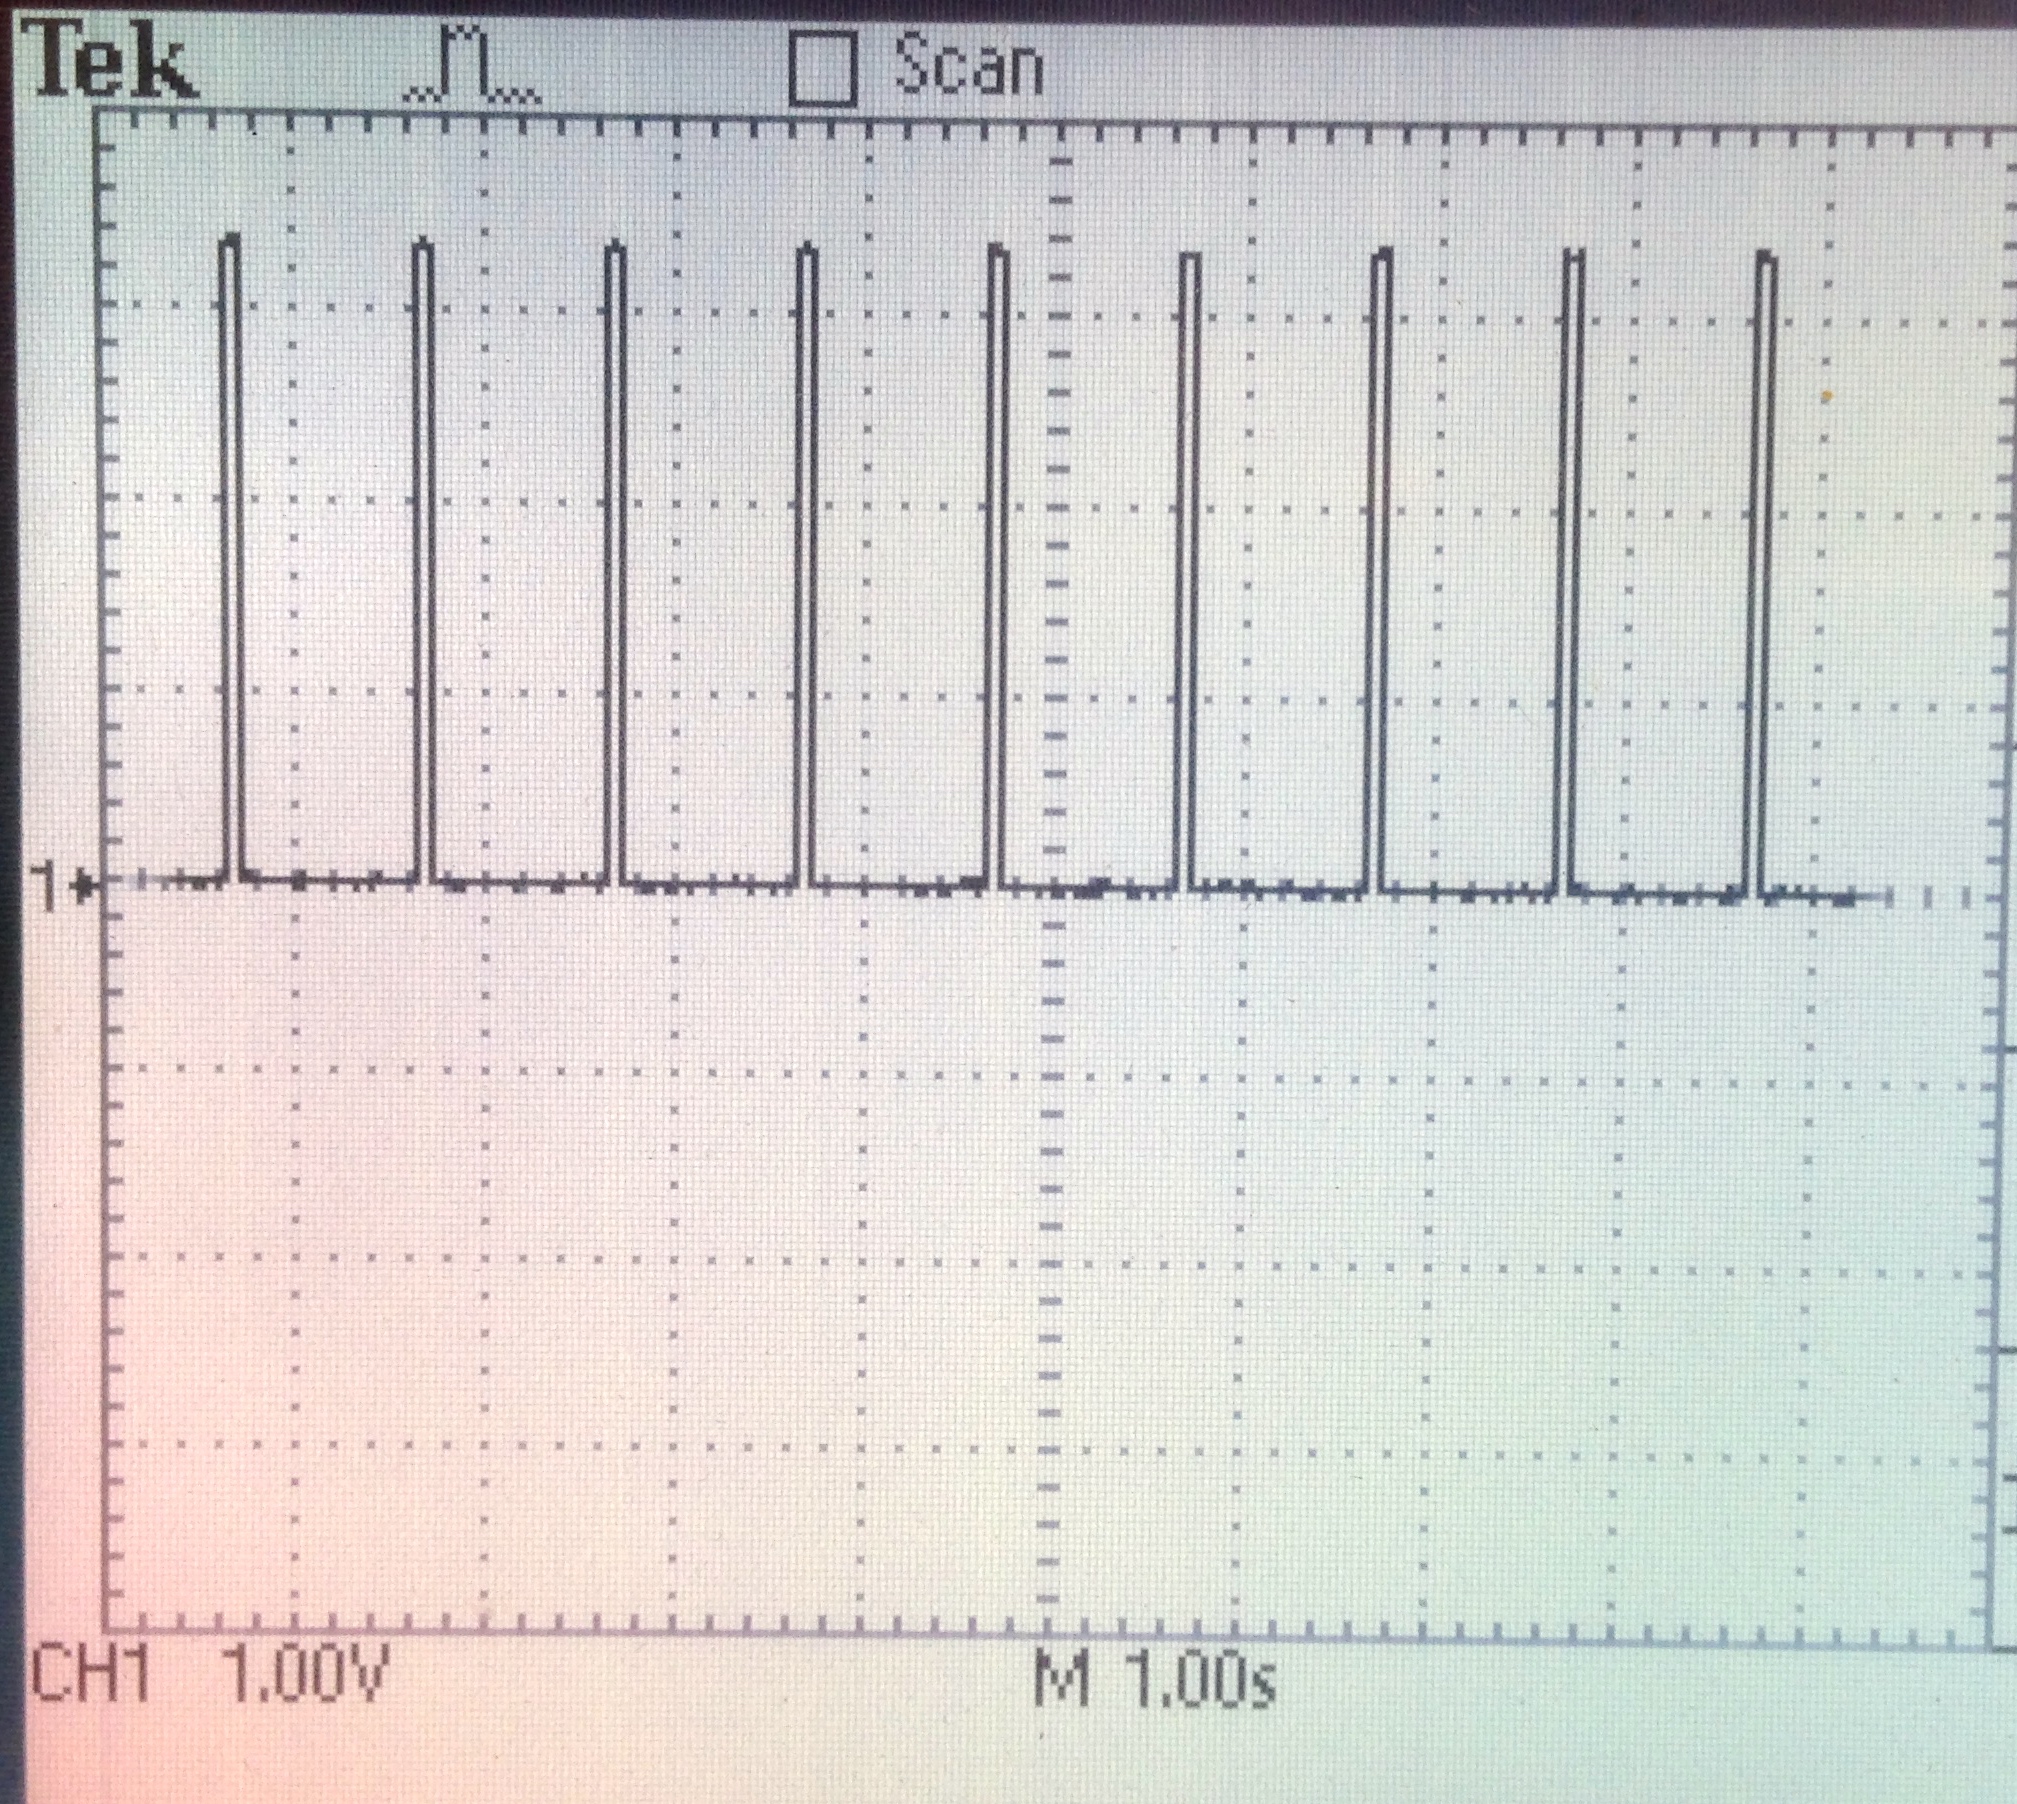
图2-3是放大的PPS信号,从中可以看出脉冲宽度是100ms:
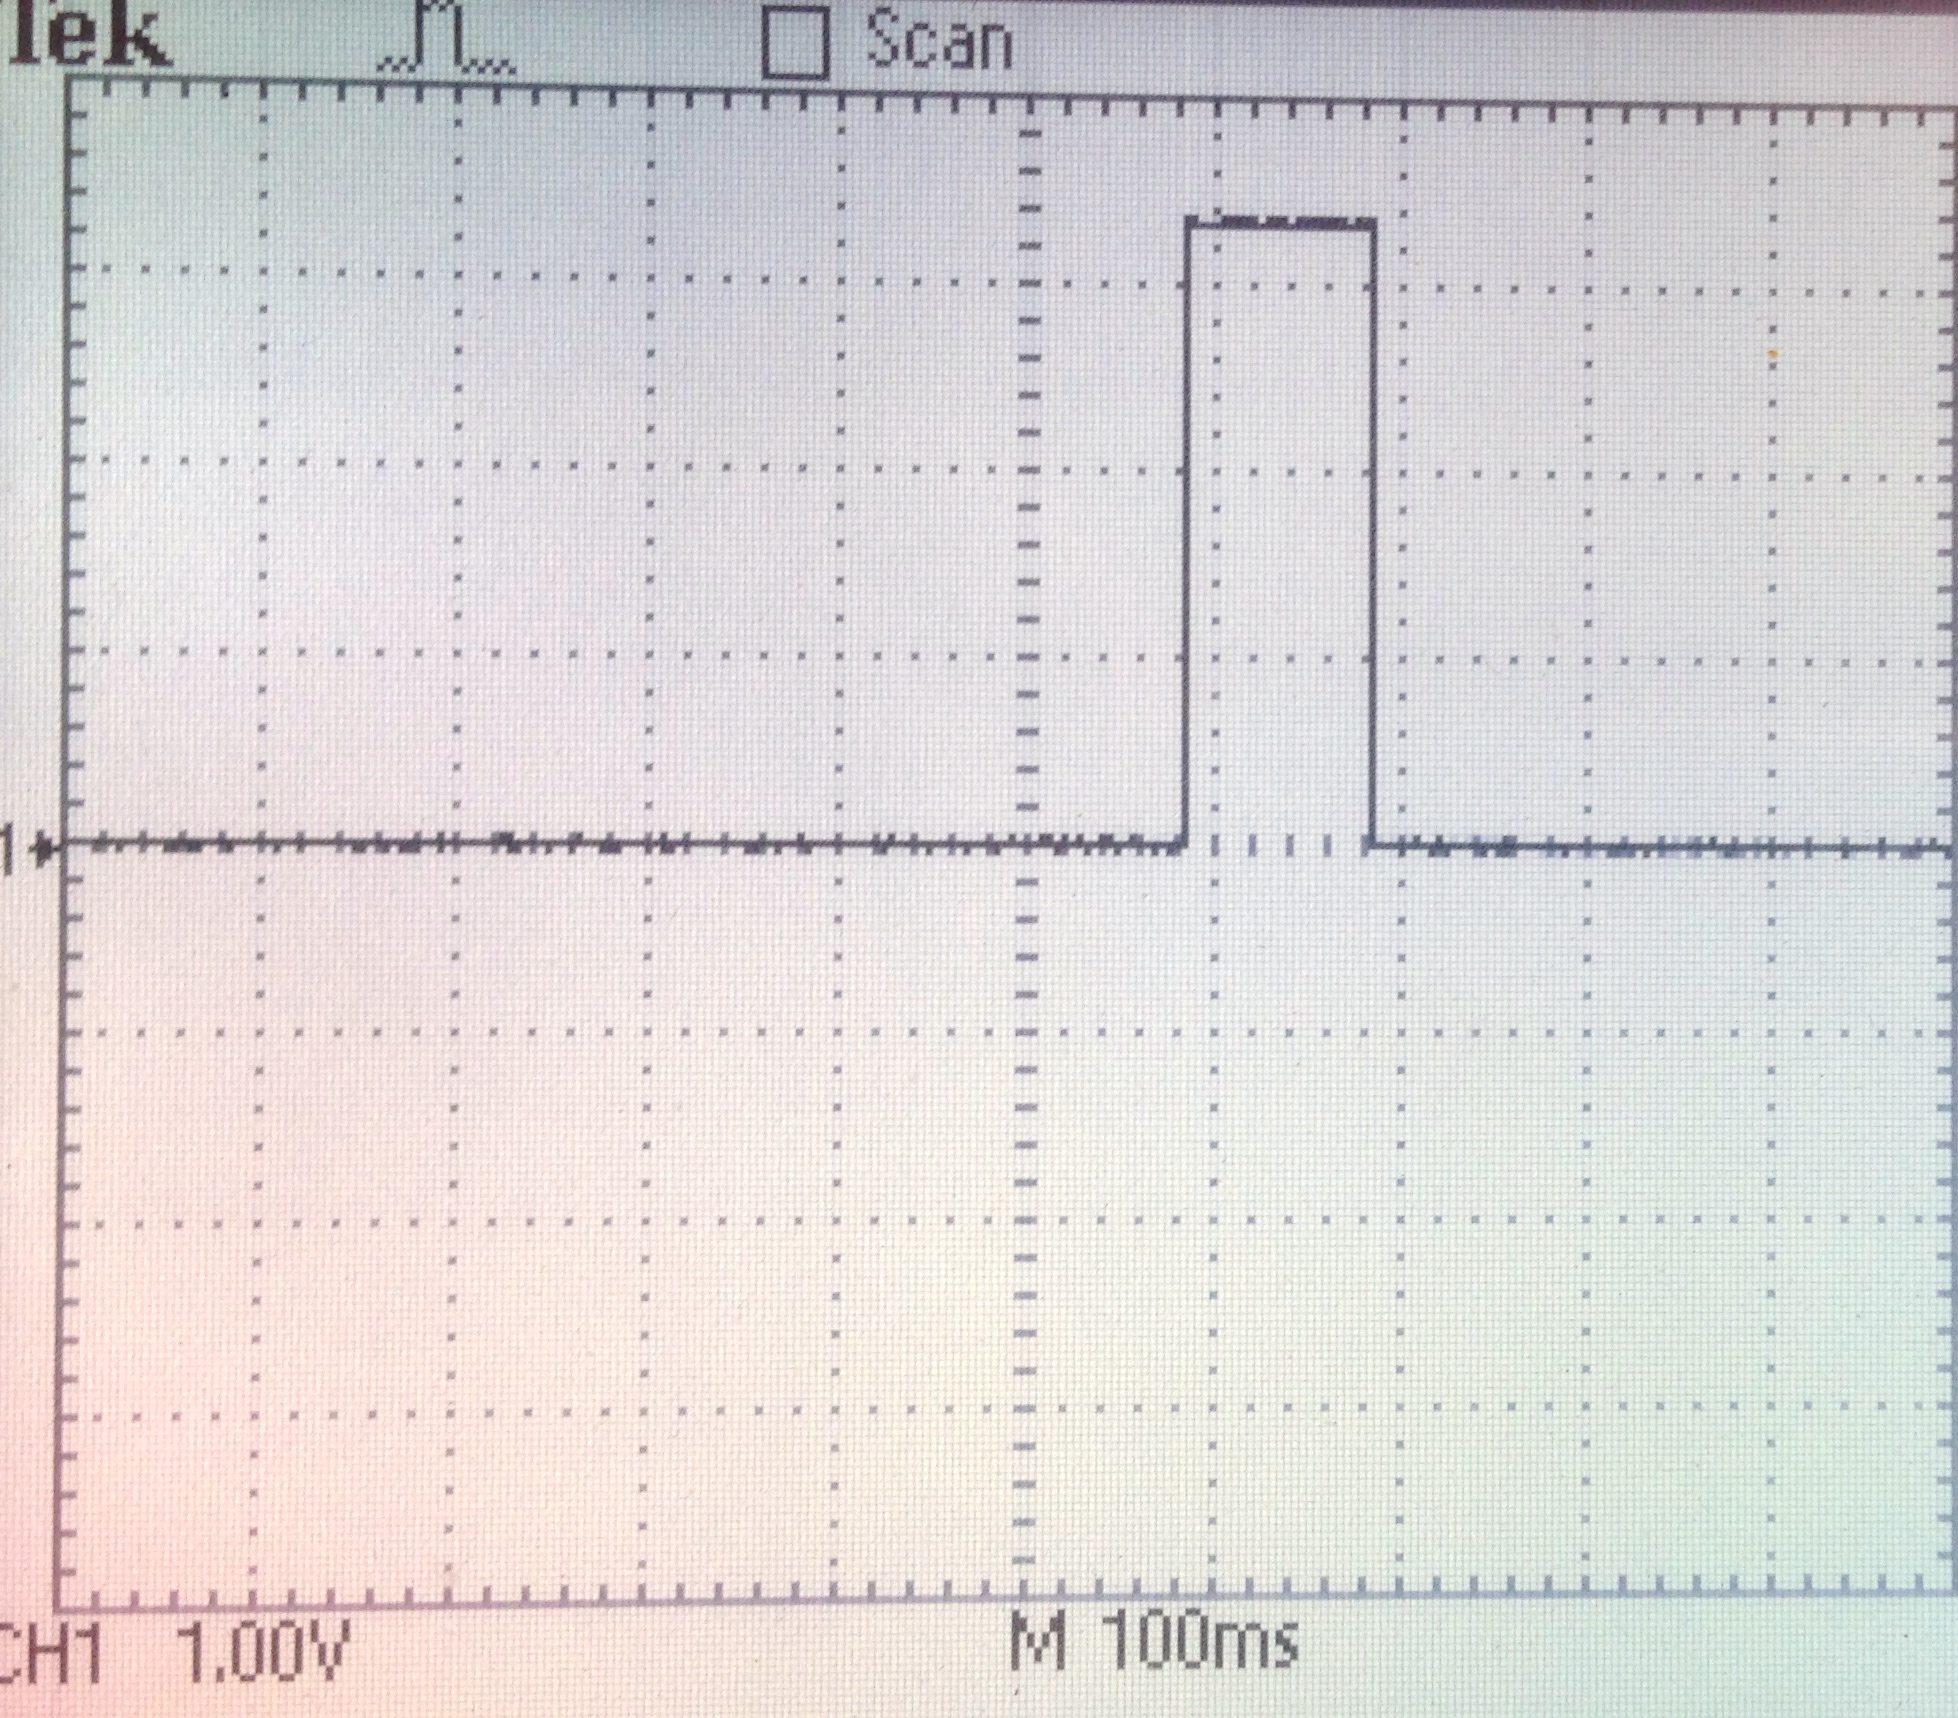
图3-1是RPi的GPIO插座的定义:
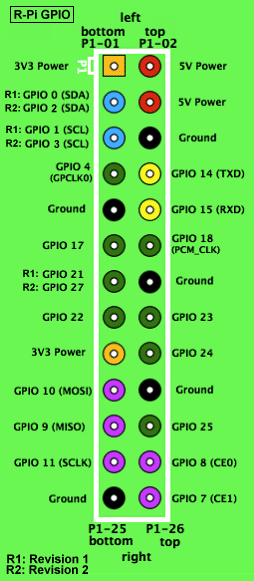
可以看出,接GPS的串口数据时需要用到
与G3203的J4连接如下:
| RPi | G3203 | 说明 |
|---|---|---|
| P1-04 | J4-1 | 5V |
| P1-06 | J4-6 | Ground |
| P1-10 | J4-2 | G3203's TXD -> RPi's RXD |
| P1-18 | J1-2 | PPS |
连接完成后,在RPi上启动picocom,就能看到GPS的输出。

首先修改启动配置:
sudo vi /boot/cmdline.txt
在行末加上(用大写的A就可以直接到行末去添加)
bcm2708.pps_gpio_pin=18
然后,
#2020-12-19修改: 修改boot/config.txt,sudo vi /boot/config.txt
dtoverlay=pps-gpio,gpiopin=18
sudo vi /etc/modules
在最后加上:
pps-gpio
重启后,就可以看到/dev/pps0。lsmod也可以看到ppsgpio和ppscore两个模块了。
安装pps-tools:
sudo apt-get install pps-tools
可以测试PPS了:
sudo ppstest /dev/pps0
得到:
trying PPS source "/dev/pps0"
found PPS source "/dev/pps0"
ok, found 1 source(s), now start fetching data...
source 0 - assert 1421066632.974111422, sequence: 1698 - clear  0.000000000, sequence: 0
source 0 - assert 1421066633.974045488, sequence: 1699 - clear  0.000000000, sequence: 0
安装gpsd:
sudo apt-get install gpsd gpsd-clients python-gps
启动gpsd:
sudo gpsd /dev/ttyAMA0 -n -F /var/run/gpsd.sock
查看gps数据:
cgps -s
得到:
┌───────────────────────────────────────────┐┌─────────────────────────────────┐
│    Time:       2015-01-12T13:11:51.000Z   ││PRN:   Elev:  Azim:  SNR:  Used: │
│    Latitude:    30.282909 N               ││   3    17    263    34      Y   │
│    Longitude:  120.106591 E               ││   8    54    346    31      Y   │
│    Altitude:   55.9 m                     ││   9    00    323    00      Y   │
│    Speed:      0.0 kph                    ││  14    18    150    41      Y   │
│    Heading:    0.0 deg (true)             ││  16    60    279    37      Y   │
│    Climb:      0.0 m/min                  ││  19    06    196    16      Y   │
│    Status:     3D FIX (13 secs)           ││  20    06    293    00      Y   │
│    Longitude Err:   +/- 2 m               ││  21    07    098    00      Y   │
│    Latitude Err:    +/- 2 m               ││                                 │
│    Altitude Err:    +/- 6 m               ││                                 │
│    Course Err:      n/a                   ││                                 │
│    Speed Err:       +/- 17 kph            ││                                 │
│    Time offset:     0.639                 ││                                 │
│    Grid Square:     PM00bg                ││                                 │
└───────────────────────────────────────────┘└─────────────────────────────────┘
配置gpsd会在系统启动时装载:
sudo dpkg-reconfigure gpsd
注意当询问运行选项时,要加上-n来保证启动的时候会连接GPS。
RPi自带的nptd是一个裁剪版,不支持PPS,所以得自己下载源码编译一个。
先安装libcap-dev:
sudo apt-get install libcap-dev
然后从: http://archive.ntp.org/ntp4/ 找到最新的ntpd版本,下载在rpi上:
wget http://archive.ntp.org/ntp4/ntp-4.2.8p1.tar.gz
解压、配置、编译:
tar xzf ntp-4.2.8p1.tar.gz
cd ntp-4.2.8p1/
./configure --enable-linuxcaps
配置要花不少时间,在我的RPi上用了13分钟。
然后make:
make
编译也要不少时间,我用了20分钟。先安装到/usr/local:
sudo make install
停下现在的ntpd:
sudo service ntp stop
拷贝文件:
sudo cp /usr/local/bin/ntp* /usr/bin/
sudo cp /usr/local/sbin/ntp* /usr/sbin/
启动ntpd:
sudo service ntp start
编辑ntp.conf:
sudo vi /etc/ntp.conf
在所有的server行之前加上:
# Server from shared memory provided by gpsd
 server 127.127.28.0 minpoll 4 maxpoll 4
 fudge 127.127.28.0 time1 0.000 refid GPS stratum 15

# Kernel-mode PPS ref-clock for the precise seconds
 server 127.127.22.0 minpoll 4 maxpoll 4
 fudge 127.127.22.0  flag3 1  refid PPS
并把原本的4行server改成:
server 0.debian.pool.ntp.org minpoll 10 maxpoll 15 iburst prefer
server 1.debian.pool.ntp.org minpoll 10 maxpoll 15 iburst
server 2.debian.pool.ntp.org minpoll 10 maxpoll 15 iburst
server 3.debian.pool.ntp.org minpoll 10 maxpoll 15 iburst
然后重新启动ntpd:
sudo service ntp restart
查看一下ntpd的连接情况:
ntpq -crv -p

associd=0 status=011b leap_none, sync_pps, 1 event, leap_event,
version="ntpd 4.2.8p1@1.3265 Thu Feb 26 13:54:39 UTC 2015 (1)",
processor="armv6l", system="Linux/3.12.35+", leap=00, stratum=1,
precision=-18, rootdelay=0.000, rootdisp=1.165, refid=PPS,
reftime=d899ab44.a7651f4e  Thu, Feb 26 2015 22:25:08.653,
clock=d899ab50.198f4bd4  Thu, Feb 26 2015 22:25:20.099, peer=64998, tc=4,
mintc=3, offset=0.187453, frequency=-42.887, sys_jitter=0.362315,
clk_jitter=18.806,  clk_wander=0.120
 remote           refid      st t when poll reach   delay   offset  jitter
==============================================================================
 SHM(0)          .GPSD.          15 l   13   16  377    0.000  -129.68   1.609
oPPS(0)          .PPS.            0 l   12   16  377    0.000    0.187   0.362
*dns.sjtu.edu.cn 79.213.241.147   3 u   34   32   41   15.281   -0.708  76.747
+dns1.synet.edu. 202.118.1.46     2 u    7   32   27   53.652   -0.970  75.937
需要等候一点时间才会看到PPS起作用。
这里的字段含义是:
注意到这里GPS的数据有130ms的误差,重新编辑ntp.conf,把这个误差做进去:
fudge 127.127.28.0 time1 +0.130 refid GPSD stratum 15
再次编辑/etc/ntp.conf,找到restrict段:
# Local users may interrogate the ntp server more closely.
restrict 127.0.0.1
restrict ::1
在其后加上:
restrict 192.168.1.0 mask 255.255.255.0 nomodify
这样就允许本地LAN内的机器获得时间数据了。
如果在上面那条配置中,把最后的nomodify去掉,则可以从本地机器上直接查看ntpd的情况,如:
ntpq -p 192.168.1.21
如果你的ntp服务器的ip是21的话。
在Windows上,可以调整Internet时间服务器的地址为自己的:

gpsd — a GPS service daemon,http://catb.org/gpsd/
The Raspberry Pi as a Stratum-1 NTP Server, http://www.satsignal.eu/ntp/Raspberry-Pi-NTP.html
GPSD Time Service HOWTO,http://catb.org/gpsd/gpsd-time-service-howto.html